Online backup is one of those things that everyone knows they need but no-one wants to set up.
The last ransomware incident finally lit a fire under my butt to figure out the best cloud backup for photographers.
If you don’t know what ransomware is, you should, but it’s only one of many reasons why a cloud backup is crucial.
Many people just rely on an external drive. In fact, that’s all I had as well.
Just a copy of my photos on an external drive that’s plugged into my computer. But that’s not good enough with the threat of ransomware, fire or theft.
So I set to work trying to figure out the best online backup for photographers in 2019.
Let's Get Started
This post has affiliate links. If you use the link, you don’t pay anything extra but Sidecar Photo gets money for another glass of wine!
What’s ransomware?
Before we get started, let me explain what ransomware is.
Ransomware is like a virus controlled by a hacker that takes over your computer and encrypts every file in or connected to your computer. Except you don’t know the encryption password, the nefarious hacker does.
In other words, all the data in your computer is encrypted and locked away from you, including your backup drive. Then the hackers demand a ransom to give you your files back.
If you had kept your local backup drive unplugged, it’s possible the files are fine. But then you fall into the likely trap of not having a recent update, because your backup drive was always unplugged.
(To learn more about ransomware, here’s NYT’s take.)
The only way around this (and long standing threats like fire and theft) is real cloud backup, and preferably you want that encrypted (with a password you do know) so no-one can hack the cloud storage.
I know, I know, sounds super expensive, right? But it’s not! Because I just did the research and figured out the best two solutions for you.
The solution I went with is Backblaze and I’m going to explain the simple version and the advanced version to you in a second.
But before we do that, let’s talk about which features are important for photographers.
Best Online Backup for Photographers
So why are photographers’ needs different than anyone else’s? Well, mostly because the storage capacity needed by photographers is a lot greater than your average user.
Most average users’ needs are met, more or less, by Apple, Google and Dropbox’s solutions.
You can store < 15GB of your music, photos and some documents in iCloud, Google Drive or Dropbox for cheap or free.
Once you get in the realm of thousands of files and 100GB+ of photos, you start needing a better solution.
You can get a lot more space for a monthly price, but there’s one other factor that’s important to understand. Those are all “syncing” services, not backup services.
What’s the difference? Well, with syncing services, if you delete a file from one location, it gets deleted from all locations. Which is sort of the opposite of what you want from a backup service.
On top of that, many of these services limit what kinds of files you can sync.
Of course there are caveats, Dropbox, for example, will store 30 days of history. So that might be good enough for some.
Every service is different and every user is different. But, at least we can hope that we photogs want some of the same things.
Lots of space for an affordable price and true backup is what I needed for my solution.
The Perfect Photographer’s Backup Workflow
I hate tedious workflows so my dream backup workflow goes something like this –
I bring my camera home and import into lightroom. That’s it.
Yep, that’s right. No more work. Something at some point makes sure there’s a backup of that file. And I don’t have to do anything regularly to make sure that happens.
Then, some day when my drive dies, I calmly restore from my backup.
When my house burns down, I buy a new computer, and calmly restore from my backup.
When Russian hackers take my computer hostage, I make a cup of tea, calmly reformat the whole thing, and restore from my backup.
Are you starting to see a pattern here? Isn’t that much better than the feeling of panic you get when someone asks you – “Your house is burning down! What do you do?” And you imagine yourself lugging your computer and external drives through the flames like a crazy person because you forgot to backup?
I want simplicity, reliability, encryption and an offsite location at a good price.
Backblaze Backup for Photographers
So my solution was to pick the online service Backblaze.
If you do any research on this, you’ll see CrashPlan is the other popular option.
So why didn’t I pick CrashPlan? Well, I’ll be honest. I did pick CrashPlan at first, except I thought I set it up and it was backing up. But after a few months I realized some sort of trial period had expired and it was not backing up anywhere.
Stupid me? Maybe. But the software was running and not telling me about the failure.
With a backup service, the backups could fail at any time for any reason. Your card on file expired and your online storage is no longer working or whatever.
And it should tell you, it should scream at you – I’M NOT BACKING SHIT UP, LADY! DO SOMETHING!
It didn’t warn me adequately and so I uninstalled.
The most important aspect of a good online backup workflow is the ability to set-it-and-forget-it.
I’m not IT – it’s not my job to check weekly that backup systems are working. I want a solution I can rely on to work, and to let me know when it doesn’t.
I can barely get myself to work in one piece, I’m not babysitting a backup service.
So Backblaze Backup was the next software I tried. And I can recommend Backblaze for photographers.
I’m going to give you the easy way and the advanced way to set up your backup.
I went with the advanced way, and I’ll explain why. But the simpler setup might work fine for you, so I’ll cover both.
Best External Hard Drives for Photographers
Okay before we explore online backup services, you ARE also doing a local backup right?
The best overall backup strategy is always 3-2-1.
- Keep at least 3 separate copies of your data.
- Use 2 types of media
- Keep 1 backup copy offsite. This is your cloud backup
So you really want your live copy, a local backup and a cloud backup. 3 copies. If you haven’t done this, I strongly suggest you buy a drive for local backup.
Why bother? Trust me, it is soooo much faster restoring from local backup rather than the cloud.
For this you want the most reliable drives. All drives fail, they just do, even the top 5 manufacturers’ drives. But some drives have worse records than others and you just avoid those. Scouring reliability scores for external harddrives, these 2 stand out.
Best drives for local backup:

![]()
Excellent option: WD Elements Portable External Hard Drive Check current price
This drive is USB 3.0 compatible and portable which means you don’t need a separate power adapter for it. Just plug into USB and you’re good to go. Great for travelers!
Budget option: Seagate Backup Plus 4TB Check current prices
This is a desktop drive that needs a power supply but nevertheless comes with some nice features such as front facing USB ports. Great for desk use!
Backblaze Backup – The Easy Way
Backblaze Backup is desktop software for Mac or PC.
You pay $5 per month per computer and get unlimited storage space. Super simple.
It’s a really straightforward process. You download the software here and install it.
It quickly checks your computer for your files and gives you the total amount you have to backup.
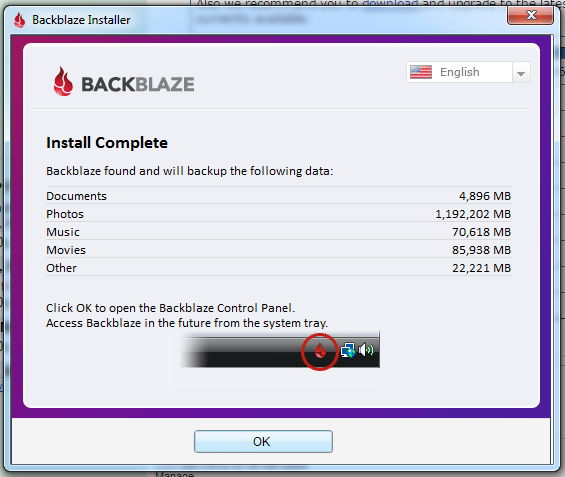
And right away it starts the backup. Yippee!
It actually takes a while to backup all your files the first time, but by default it will just run in the background so just let it go for a while.
Backblaze Settings for Photographers
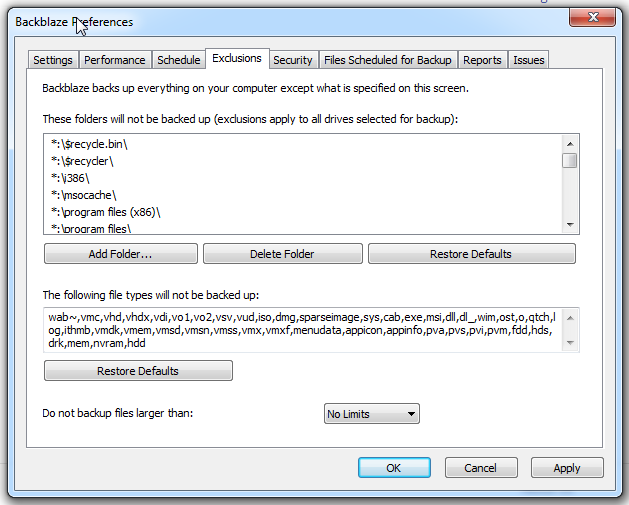
Backblaze Backup has a tab in the Settings with Exclusions. Do pop in there and check that you are not excluding large files. The Lightroom Catalog can be quite a large file.
Archive
Backblaze Backup does not work as an archive, so do not upload files and then delete them off your computer or Backblaze will delete them in 30 days.
This goes for external drives as well, do not disconnect them for more than 30 days, or it will look like you deleted the files.
That was not good enough for me because I’d like to archive some photos. So I went with the Advanced Way described below.
But if you don’t need to archive, and rarely unplug your external drive, this is a simpler solution.
Encryption
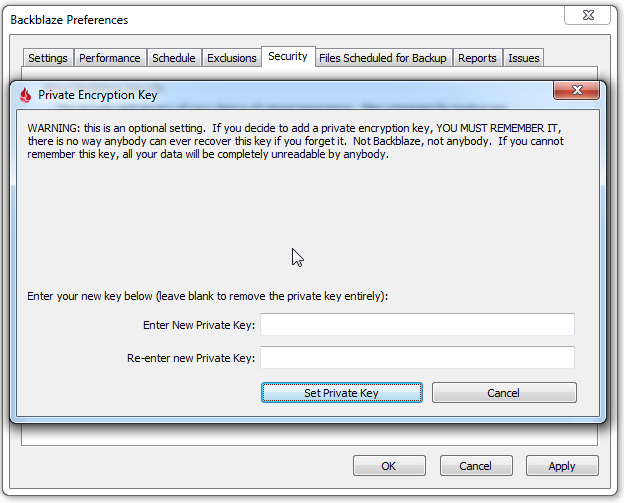
Encryption is turned off by default. You should go in and turn it on in Settings > Security > Private Encryption Key.
But for the love of God, you must remember that passphrase when you want to recover your files. Or else you will not be able to recover your files.
Save this passphrase somewhere safe, and not on your computer.
House on Fire Scenario
So let’s revisit – when you upload new photos to your computer, that’s it. Backblaze’s software will notice the new files and back them up to their server. Great.
When you wake up in the middle of the night and your house is on fire, you can just run out that front door. (Although maybe wake your husband or wife first.)
Later, you can either restore your files for free over the internet by installing Backblaze Backup on your new machine. Or you can have them ship you a drive for a price.
Just don’t forget that password! And don’t unplug external drives for more than 30 days.
So there you have it – an extremely easy online backup workflow for photographers. For $5 a month.
Backblaze and CloudBerry – The Advanced Way
The advanced way is a more challenging to setup so I suggest you use the simpler online backup service if you’re not feeling too tech savvy.
This way gives you more options, is super affordable and you can use the cloud storage as an archive.
By this I mean, I can upload photos and delete them off my local computer and they will be preserved in the cloud.
To use this, you use the desktop software called CloudBerry and business storage called Backblaze B2.
CloudBerry
CloudBerry isn’t made by Backblaze. It’s backup software that talks to a variety of different storage options, such as Backblaze’s business storage or B2.
CloudBerry for Desktop is a one-time charge of $30. It’s got a ton of great features that let you use it to setup a more powerful, flexible solution.
Backblaze B2 is a ridiculously cheap $0.005 per GB. There are small charges for download as well. There’s an online calculator if you want to play around with it.
For a sample price, if you uploaded 500GB and added 10GB worth of files monthly, it would cost just $2.825 per month on average for the year.
It might sound complicated but you just pay for what you use, and it was fairly easy to setup.
For photographers looking to backup a large archive, this is a great option.
Installation Steps
- Install Cloudberry from here. They have Windows, Mac and Linux versions. Use a real email address as you need it for the license.
- Sign up for Backblaze B2 storage here. You get 10GB for free without a credit card.
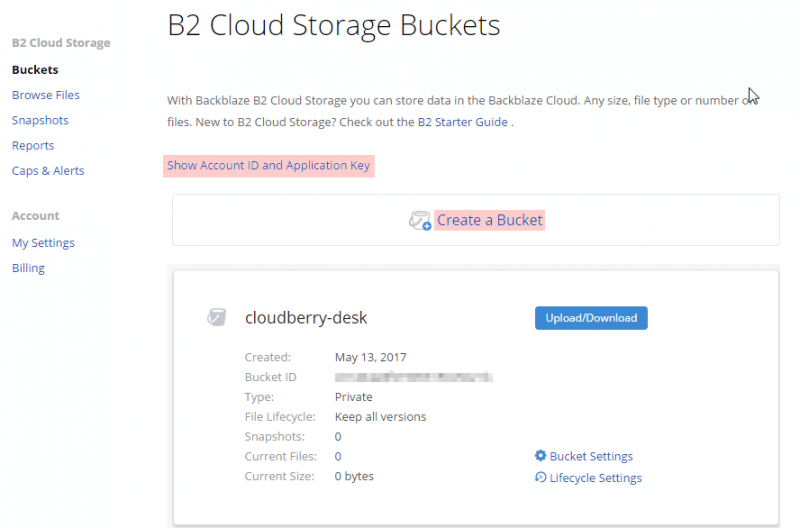
- Create a bucket in B2 for your files. Get an account ID and application key from B2.

- In Cloudberry, create a backup plan. A backup plan is the job that gets run to backup your computer. You can have multiple jobs if you want different settings.
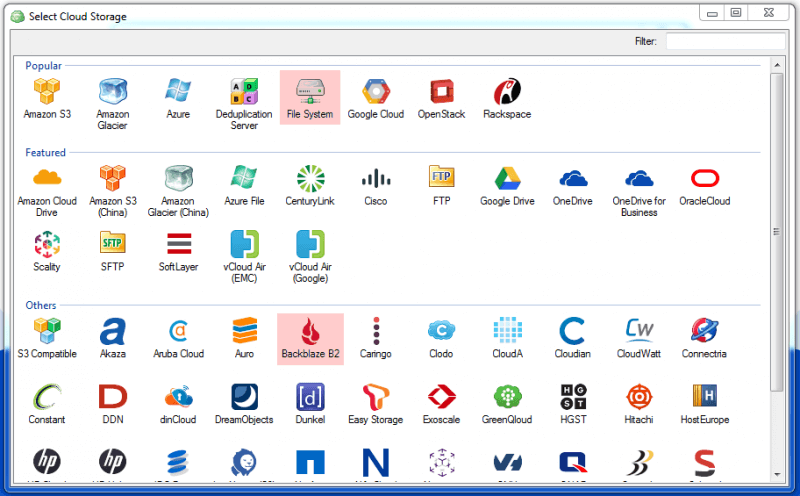
For example you can set up a separate job to keep a backup on an external hard-drive using File System as your storage.
In this case, though we are going to setup Cloud Backup so you should select Backblaze B2 as the cloud storage destination.

- Enter the B2 account ID and application key to allow Cloudberry to connect to B2. Pick the B2 bucket you created earlier.
- Select the files and folders you want to backup. You want to backup as much as possible, so in addition to your Documents, Music and Pictures folders, be sure to add your Desktop and User folders as well. Make sure you backup the Lightroom Catalog.
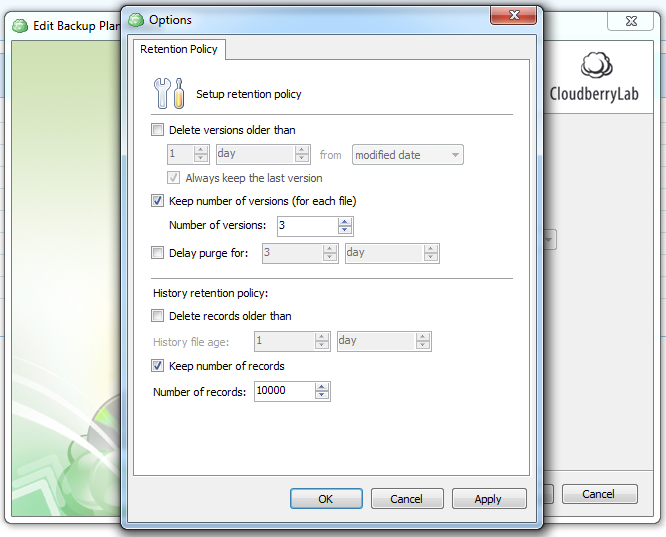
- Enable encryption and versioning. Versioning is handled by the retention policy. This is where you can ensure files are held even if you delete them locally. This is how you would “archive” your photography.
I selected 3 versions here but there are a variety of options. This seems like a lot of space but Cloudberry also uses compression to reduce the space usage on server.

- And tadaa, you have setup a cloud backup workflow for your photography!
House on Fire Scenario
So again – all uploaded photos will backup to Backblaze’s servers.
You can set up a local backup to an external hard-drive for a 3-2-1 solution. 3-2-1 is a well-known backup strategy.
If you want to archive photography, back it up, and make sure through Cloudberry’s interface that you have the backups in the cloud and the retention policy is correct. Then you may delete them locally. (I still would prefer to keep an external hard-drive copy).
If you lose your files, you can restore with Cloudberry which has a free restore option so you don’t have to have your license information.
Again, don’t forget that encryption password! If you’re lucky, the time between when you setup the backup and need to restore might be very long, and therefore incredibly easy to forget that password.
And that’s it – the best online backup for photographers that is powerful and flexible enough to customize. And yet, totally affordable.
Conclusion
It’s becoming really terribly important to protect our data the same way we protect our homes and physical belongings.
As a photographer, my things of great sentimental value are my photographs.
These photos of vacations, travel and parties are more than just photos; they are infused with memories and experiences.
They document not just my life but our lives, a record of our time and place in the world. Of people we loved and moments we shared.
I have few physical things that mean more to me.
So take a minute to protect your valuable belongings, and have total peace of mind if anything happens to your laptop, whether you get hacked or simply lose it or damage it. I can recommend Backblaze for photographers.
Have you lost data before? Tell us in the comments how you backup your photos.
This post has affiliate links. If you use the link, you don’t pay anything extra but Sidecar Photo gets money for another glass of wine!
